Custom Error Page
Cloudflare Custom Error Pages let you replace the default Cloudflare error messages with your own branded pages. Instead of showing Cloudflare’s standard error page when an issue occurs (like 500, 502, or 503 errors).
You can design and upload a custom HTML page that matches your website’s look and feel. This helps improve user experience, maintain brand consistency, and provide helpful information or navigation options during downtime or errors.
Task
In this workshop, we’ll create a simple custom error page using Cloudflare Workers. By leveraging Workers, there’s no need to set up or maintain an additional server — the error page can be served directly from Cloudflare’s edge network. This approach not only ensures fast response times but also allows you to include troubleshooting details or helpful guidance within the error page itself.
-
Create a Cloudflare Worker – Write a script to handle error responses and return a custom HTML page.
-
Set Up Routing – Define routes so the Worker triggers when specific errors occur.
-
Configure Error Handling – Map error codes (e.g., 500, 502, 503) to your Worker so it serves the custom error page.
-
Test and Validate – Trigger errors intentionally to verify that the custom error page is displayed correctly.
Steps to create workers
- Dashboard
- Bash
Step 1: Create a Cloudflare Worker
- Go to the Cloudflare dashboard.
- Select your domain and navigate to the Workers tab.
- Click Create a Worker.
- Name your Worker (e.g., "Custom Error Page") and select Save.
Step 2: Write the Worker Code
- In the Workers Editor, click the Cloudflare Playground button.
- Replace the existing code with the code below:
(() => {
  var __defProp = Object.defineProperty;
  var __name = (target, value) => __defProp(target, "name", { value, configurable: true });

  // src/index.js
  addEventListener("fetch", (event) => {
    event.respondWith(handleRequest(event.request));
  });
  async function handleRequest(request) {
    const headersObj = Object.fromEntries(request.headers);
    const rayId = request.headers.get("cf-error-original-ray") || request.headers.get("cf-ray") || "Unavailable";
    const userIp = request.headers.get("cf-connecting-ip") || "Unknown";
    const currentTime = (/* @__PURE__ */ new Date()).toISOString();
    const html = `
    <!DOCTYPE html>
    <html lang="en">
    <head>
      <meta charset="UTF-8" />
      <title>You've been blocked</title>
      <style>
        body { font-family: -apple-system, BlinkMacSystemFont, "Segoe UI", Roboto, sans-serif; margin:0; padding:0; background:#f8f9fa; color:#212529; display:flex; flex-direction:column; min-height:100vh;}
        header { background:#dc3545; color:white; padding:1.5rem; text-align:center; }
        main { flex:1; display:flex; align-items:center; justify-content:center; padding:2rem; }
        .card { background:white; border-radius:8px; box-shadow:0 4px 10px rgba(0,0,0,0.1); padding:2rem; max-width:700px; width:100%; }
        h1 { margin-top:0; font-size:2rem; color:#dc3545; }
        p { margin:0.5rem 0; }
        ul { text-align:left; list-style:none; padding:0; }
        li { background:#f1f3f5; margin:0.25rem 0; padding:0.5rem; border-radius:4px; font-family:monospace; }
        footer { text-align:center; font-size:0.9rem; color:#6c757d; padding:1rem; }
      </style>
    </head>
    <body>
      <header>
        <h1>You've been blocked</h1>
        <p></p>
      </header>
      <main>
        <div class="card">
          <h2>Technical Details</h2>
          <ul>
            <li><strong>Status code:</strong> 403</li>
            <li><strong>Request Time:</strong> ${currentTime}</li>
            <li><strong>User IP:</strong> ${userIp}</li>
            <li><strong>RayID:</strong> ::RAY_ID::</li>
            <li><strong>User Agent:</strong> ${request.headers.get("user-agent")}</li>
            <li><strong>Workers Ray ID:</strong> ${rayId}</li>
          </ul>
          <p>${JSON.stringify(headersObj)}</p>
          <p>Please share the above information with support for troubleshooting.</p>
        </div>
      </main>
      <footer>Powered by Cloudflare Custom Error Pages</footer>
    </body>
    </html>
  `;
    return new Response(html, {
      headers: {
        "Content-Type": "text/html; charset=utf-8",
        "Cache-Control": "no-store, no-cache, must-revalidate, proxy-revalidate, max-age=0",
        "Pragma": "no-cache",
        "Expires": "0"
      }
    });
  }
  __name(handleRequest, "handleRequest");
})();
//# sourceMappingURL=index.js.map
Step 3: Deploy and Check
Once done, you may click the Deploy button to have the Workers deploy to Cloudflare edge to production.
Once the deployment is done, click on the Preview button to view the error page you've been created.
You may use bash to create the Workers on your local and push it to Cloudflare. In order to Proceed with this, you're required to install all the tools here.
Step 1: Create a project
# create a new workers project
npm create cloudflare@latest <WORKERS-NAME>

# change directory to your workers project
cd <WORKERS-NAME>
When promted:
- Choose Hellow World Example
- Which template: Worker only
- Which language: Javascript
- Use git: Yes (recommended)
- Deploy now: No (We'll do deploy manually)
Step 2: Create Error Page
Replace the following code to the file src/index.js
(() => {
  var __defProp = Object.defineProperty;
  var __name = (target, value) => __defProp(target, "name", { value, configurable: true });

  // src/index.js
  addEventListener("fetch", (event) => {
    event.respondWith(handleRequest(event.request));
  });
  async function handleRequest(request) {
    const headersObj = Object.fromEntries(request.headers);
    const rayId = request.headers.get("cf-error-original-ray") || request.headers.get("cf-ray") || "Unavailable";
    const userIp = request.headers.get("cf-connecting-ip") || "Unknown";
    const currentTime = (/* @__PURE__ */ new Date()).toISOString();
    const html = `
    <!DOCTYPE html>
    <html lang="en">
    <head>
      <meta charset="UTF-8" />
      <title>You've been blocked</title>
      <style>
        body { font-family: -apple-system, BlinkMacSystemFont, "Segoe UI", Roboto, sans-serif; margin:0; padding:0; background:#f8f9fa; color:#212529; display:flex; flex-direction:column; min-height:100vh;}
        header { background:#dc3545; color:white; padding:1.5rem; text-align:center; }
        main { flex:1; display:flex; align-items:center; justify-content:center; padding:2rem; }
        .card { background:white; border-radius:8px; box-shadow:0 4px 10px rgba(0,0,0,0.1); padding:2rem; max-width:700px; width:100%; }
        h1 { margin-top:0; font-size:2rem; color:#dc3545; }
        p { margin:0.5rem 0; }
        ul { text-align:left; list-style:none; padding:0; }
        li { background:#f1f3f5; margin:0.25rem 0; padding:0.5rem; border-radius:4px; font-family:monospace; }
        footer { text-align:center; font-size:0.9rem; color:#6c757d; padding:1rem; }
      </style>
    </head>
    <body>
      <header>
        <h1>You've been blocked</h1>
        <p></p>
      </header>
      <main>
        <div class="card">
          <h2>Technical Details</h2>
          <ul>
            <li><strong>Status code:</strong> 403</li>
            <li><strong>Request Time:</strong> ${currentTime}</li>
            <li><strong>User IP:</strong> ${userIp}</li>
            <li><strong>RayID:</strong> ::RAY_ID::</li>
            <li><strong>User Agent:</strong> ${request.headers.get("user-agent")}</li>
            <li><strong>Workers Ray ID:</strong> ${rayId}</li>
          </ul>
          <p>${JSON.stringify(headersObj)}</p>
          <p>Please share the above information with support for troubleshooting.</p>
        </div>
      </main>
      <footer>Powered by Cloudflare Custom Error Pages</footer>
    </body>
    </html>
  `;
    return new Response(html, {
      headers: {
        "Content-Type": "text/html; charset=utf-8",
        "Cache-Control": "no-store, no-cache, must-revalidate, proxy-revalidate, max-age=0",
        "Pragma": "no-cache",
        "Expires": "0"
      }
    });
  }
  __name(handleRequest, "handleRequest");
})();
//# sourceMappingURL=index.js.map
Step 3: Deploy to Cloudflare
npx wrangler deploy
When prompted which account to deploy to, select the correct account
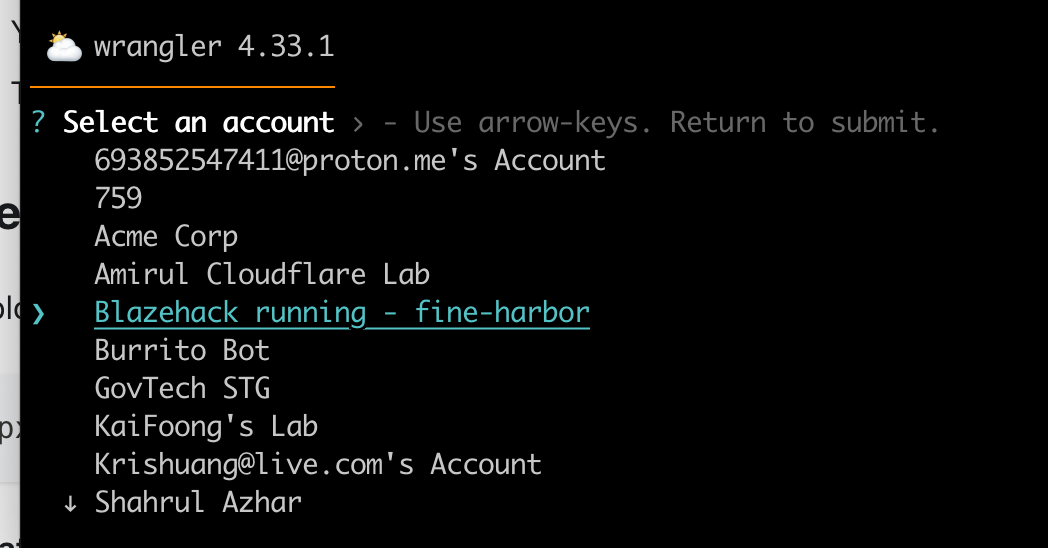
If you selected the wrong account, you may use wrangler login to relogin again and do the deployment once again. Then you'll see the account selection prompt.
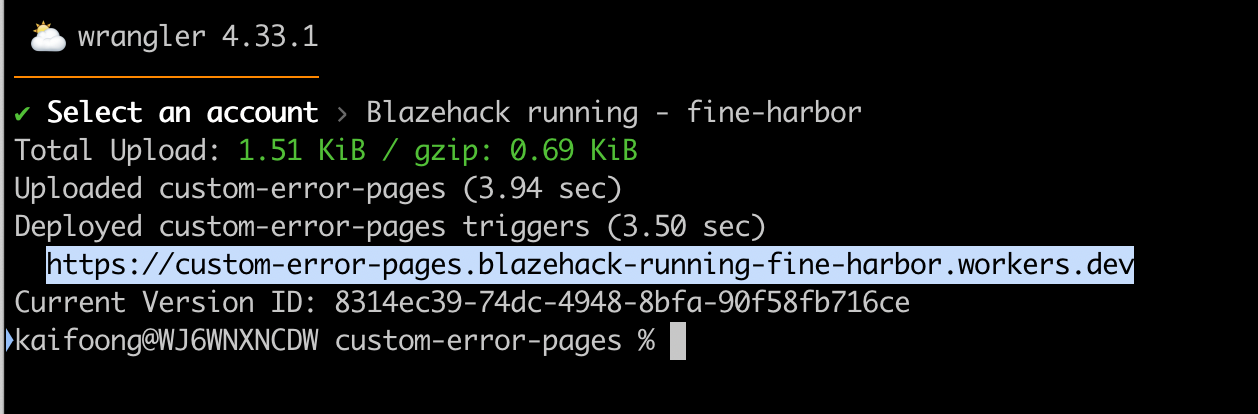
Step 4: View your Workers
Once the deployment is done, you may access to the webpage you created through copying the URL provided in the terminal.
Add routing to the workers
Since we've done created a the custom pages, now we need to add the routing to the workers in order to have it to be displayed through the correct domain and path
Step 1: Accessing Workers
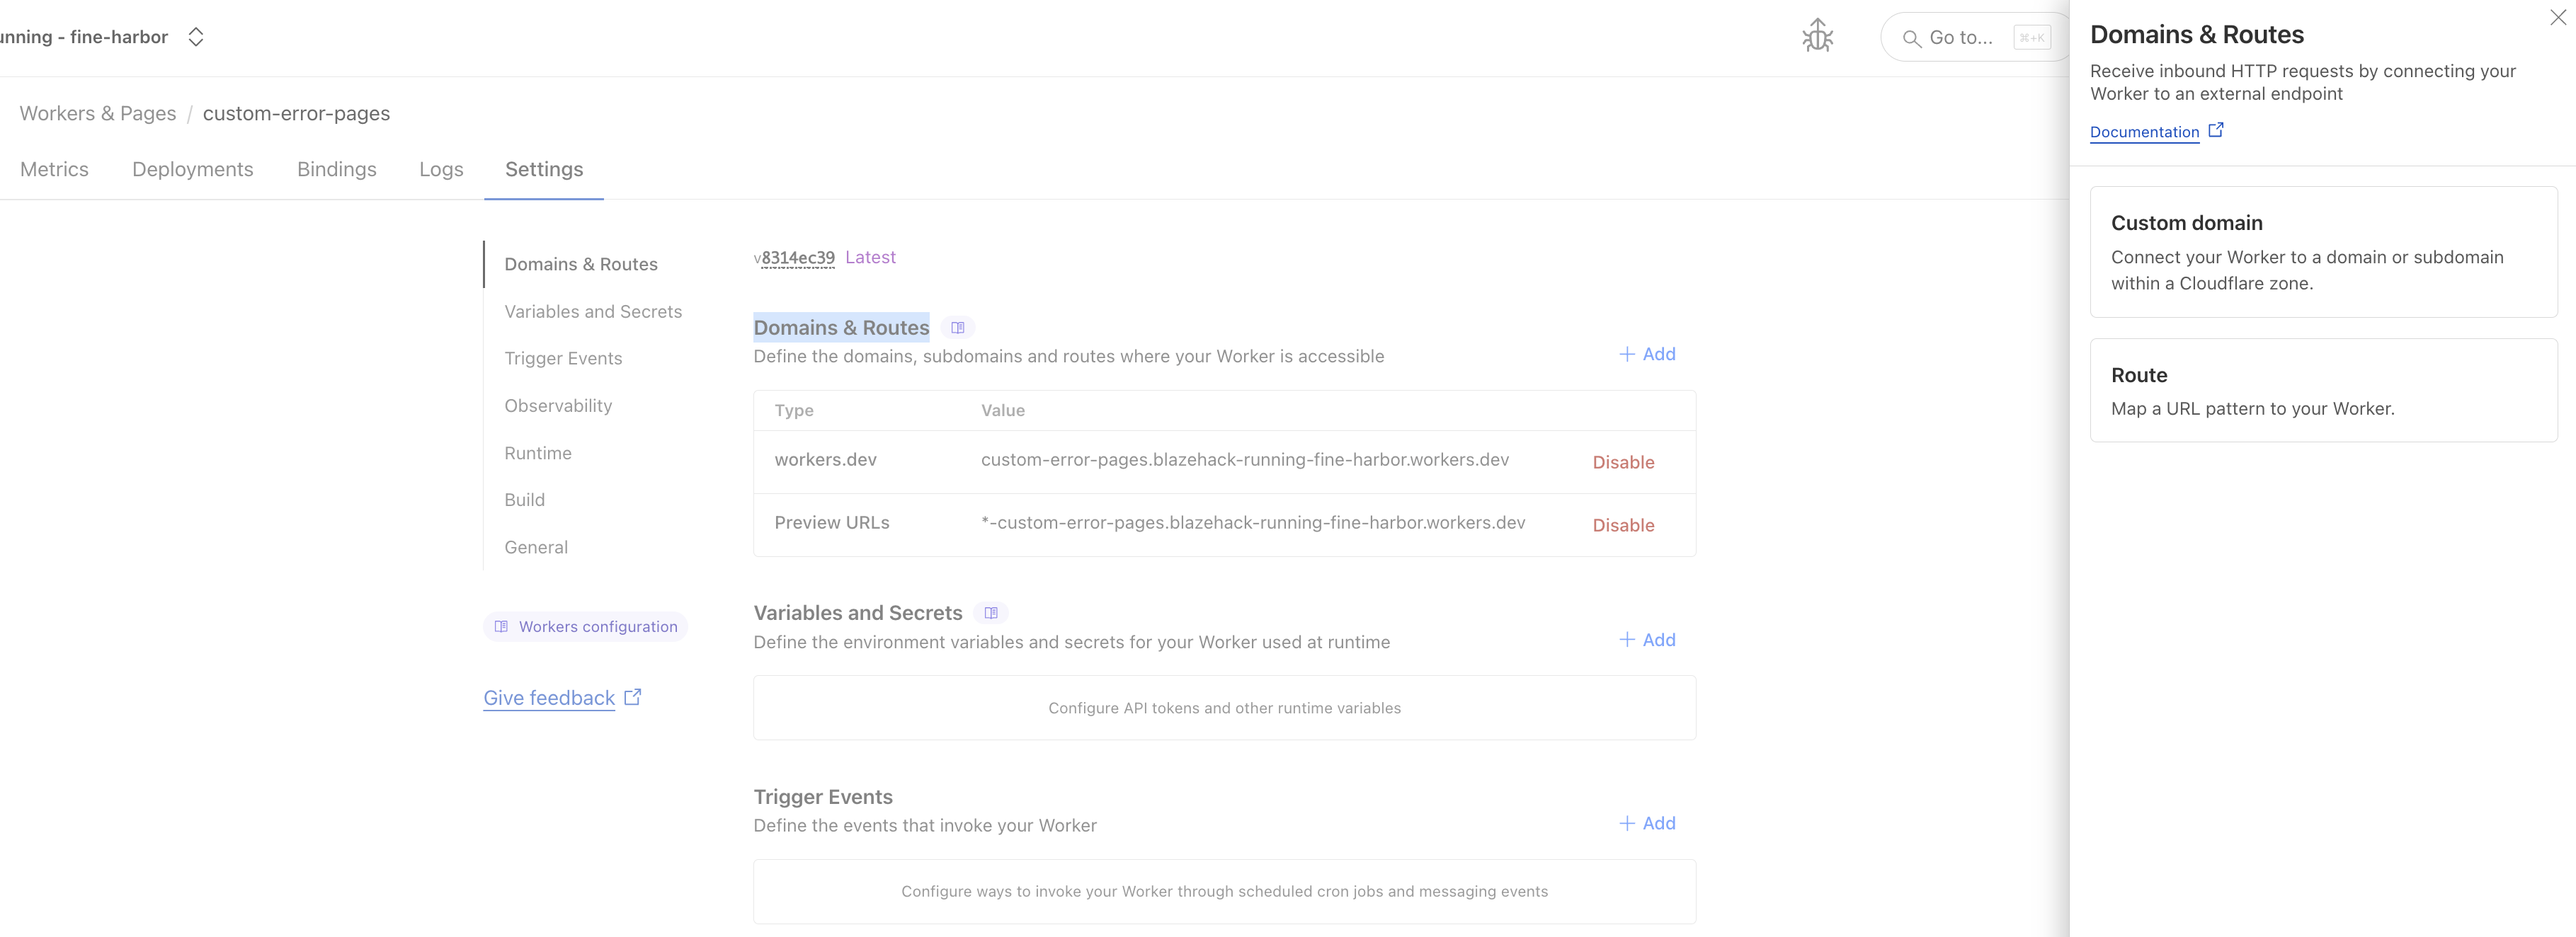
Access to your Cloudflare dashboard, under the correct account, select Compute (Workers) > <WORKERS-NAME> > Settings
Step 2: Routing Config
Under Domains & Routes, click on the Add button and select Route
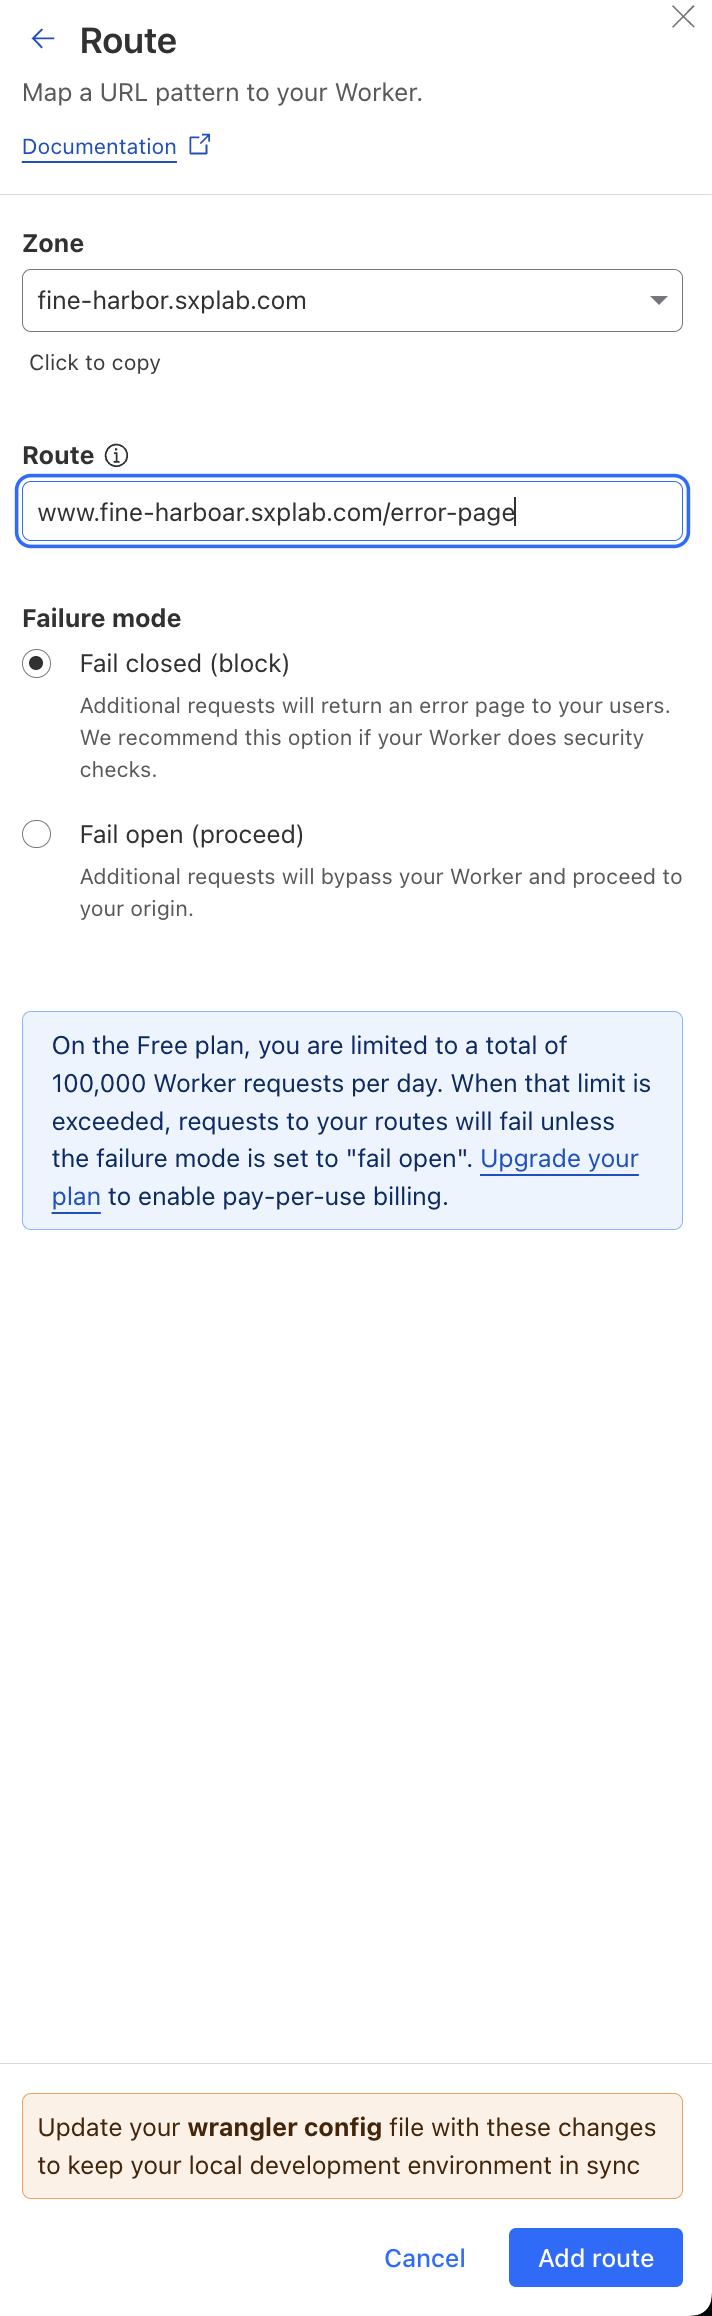
Select your zone and type the route as you wanted. For example:
- Zone:
your-zone.com - Route:
<your-domain>/error-page
Then click Add Route button at the bottom right oh your page
Step 3: Adding the to Custom Error Page
Now, since we've created the workers, we can add the URL to the Custom Error Page so that when an error is returned, it will return this page instead of Cloudflare default error page.
Go to Account home and select the assigned zone. Then click on Error Pages and do the config here.
If you want it to apply to all the zone you have, you can select Manage Account -> Setting -> Error Pages to make the change.
For example, under WAF block click on the 3 dots at it's far right and select Edit
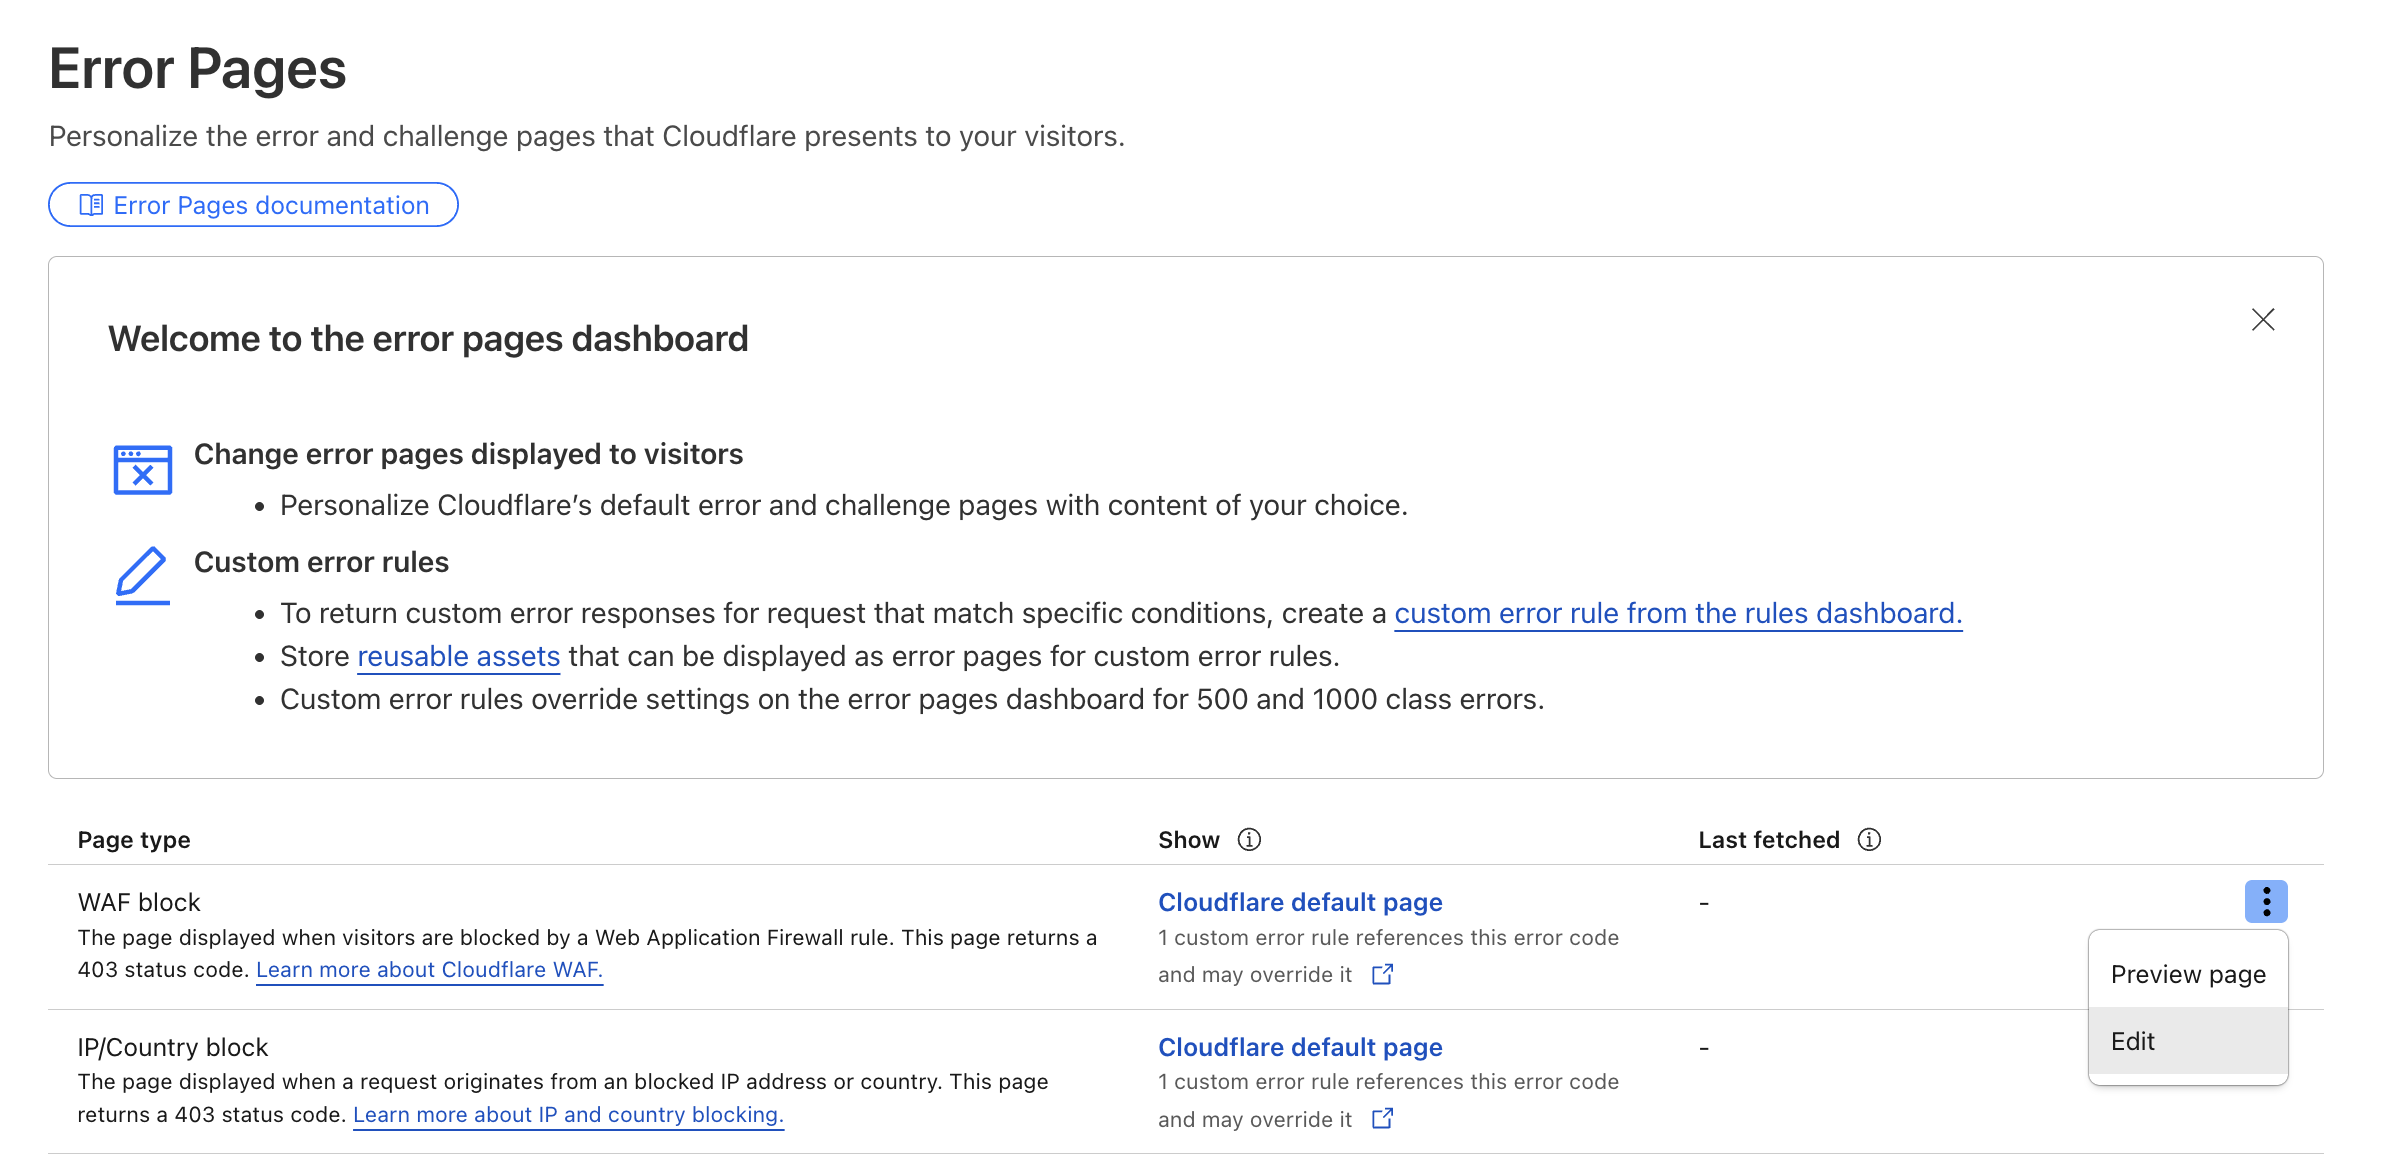
In the next page, select Custom Page and paste in the route you created just now in the Workers Route.
Now, when there's WAF block by Cloudflare, this custom error page will be returned instead of Cloudflare default block page.
Understanding Cloudflare Error Handling
Cloudflare offers powerful mechanisms to control how errors are presented to your users. Here’s a breakdown of the components at play:
1. Error Pages (Presentation Layer)
These are the pages your users actually see when an error occurs:
-
Default Error Pages
- Automatically displayed for common HTTP errors (e.g., 500, 502, 503) or security blocks.
- Basic, Cloudflare-branded, and functional—but not customizable.
-
Custom Error Pages (Zone- or Account-level on paid plans)
- Allow you to replace default pages with your own HTML—styled, branded, and informative.
- Useful for consistency in user experience—even during downtime or security events.
- Zone-level settings override account-level settings.
- Requires proper formatting and may use error tokens (like
::CLOUDFLARE_ERROR_500S_BOX::) for diagnostic info.
2. Custom Error Rules (Decision Logic)
These rules determine when and which error page should be shown:
- You can define logic using Cloudflare’s Rules engine to trigger specific error responses based on conditionals (e.g., HTTP response code, security triggers).
- These rules take higher precedence over default or custom Error Pages.
- You can serve:
- Inline HTML, JSON, or text responses
- Custom Error Assets (external pages fetched and stored on Cloudflare's edge network)
- Optionally override status codes (e.g., convert a 500 into a 503)
How It All Works Together
When an error occurs, Cloudflare follows this order:
- Look for a Custom Error Page at the account level
- Look for a Custom Error Page at the zone level
- Look for a matching Custom Error Rule at the account level
- Look for a matching Custom Error Rule at the zone level (highest priority)
- If a security product triggers a block (e.g., WAF), the rule-specific block response overrides all error pages or rules
- If none apply, serve the default Cloudflare error page
Key Takeaways
- Error Pages control what users see; Custom Error Rules control when and how errors are served.
- Custom Error Rules have higher precedence and offer richer logic and flexibility.
- You can serve inline or asset-based responses—including formatted HTML, JSON, and custom status codes.
- Including diagnostic tokens (like
::RAY_ID::) enhances troubleshooting and support experiences. - Pay attention to size limits: error assets must be ≤ 1.5 MB and inline responses ≤ 10 KB.
For more info, check out Cloudflare’s documentation on: