WAF – Rate Limiting
Rate limiting is a technique used to control how many requests a client (such as an IP address, user, or session) can make within a specific time window.
It protects your application by ensuring excessive or abusive traffic gets stopped before it can overwhelm your origin.
Why Rate Limiting Matters
Rate limiting helps defend against common threats, such as:
- Brute-force attacks → attackers repeatedly guessing usernames/passwords.
- Bot abuse & scraping → automated tools flooding endpoints with requests.
(If you don’t have Bot Management, rate limiting is a great fallback — and it also works alongside Bot Management.) - Denial of Service (DoS) attempts → attackers trying to exhaust server resources by sending too many requests.
Without rate limiting
Endpoints like /wp-login.php or /api/checkout could receive thousands of requests per second, overwhelming your application and making it unavailable.
How Rate Limiting Rules Work
You define:
- Threshold → number of requests allowed.
- Time window → how long to measure traffic (e.g., per second, per minute).
- Action → what happens when the threshold is exceeded.
Cloudflare can then:
- Block additional requests,
- Challenge the client (CAPTCHA or Turnstile), or
- Log the event for monitoring/alerting.
✅ This way, legitimate traffic continues normally, while abusive traffic is throttled or stopped.
Task
-
Understand Rate Limiting
- Read the explanation of rate limiting and why it is important.
- Discuss with your team one scenario where rate limiting is critical for an application.
-
Create an Advanced Rate Limiting Rule
-
Verify the Rule
- Run the provided
curlloop (replace with your own domain). - Observe when the HTTP status changes from 200 to 429.
- Run the provided
-
Check Analytics
- Open the rule Hit Count.
- Review the Analytics and Logs to confirm events were triggered.
Create Advanced Rate Limiting rules
- In the Cloudflare Dashboard go to
Security‣Security rules, SelectCreate ruleonAdvanced rate limiting rules.
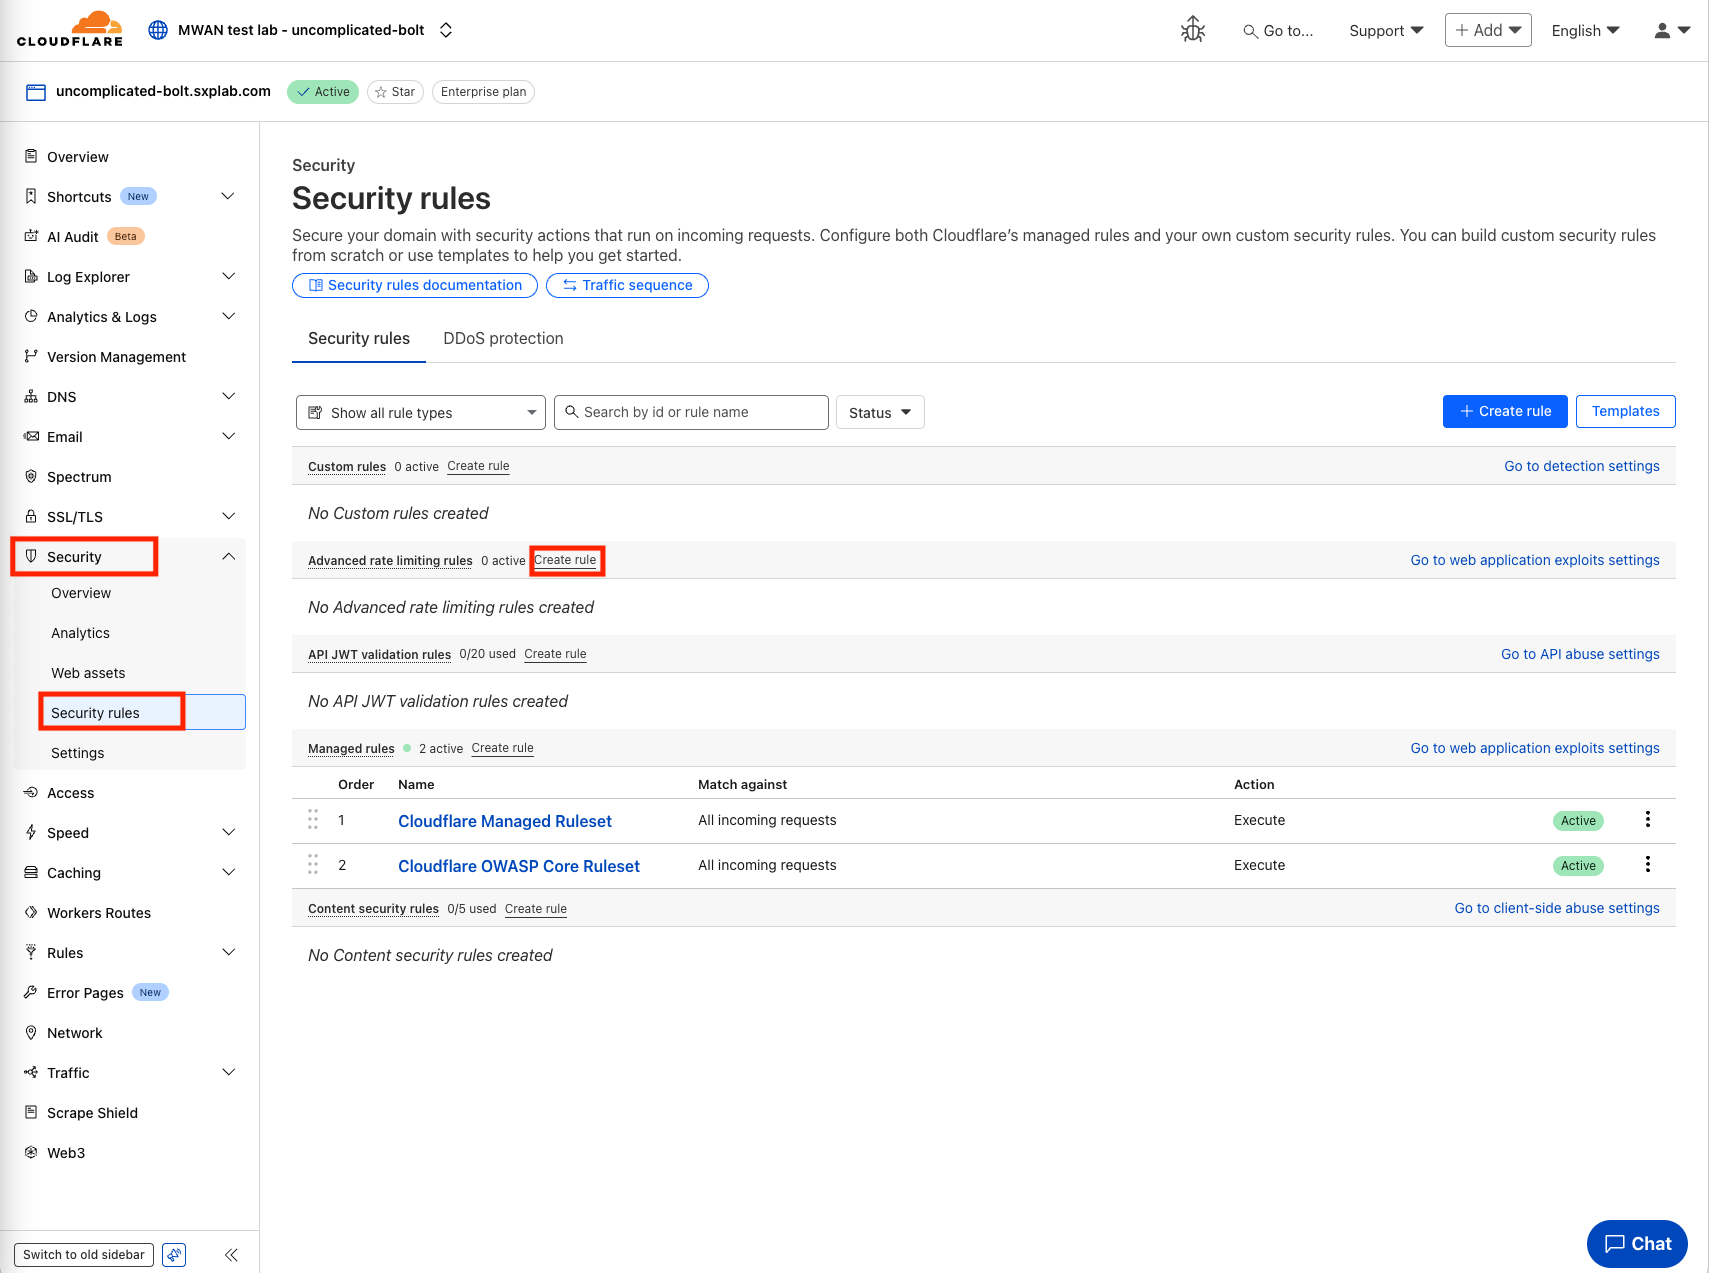
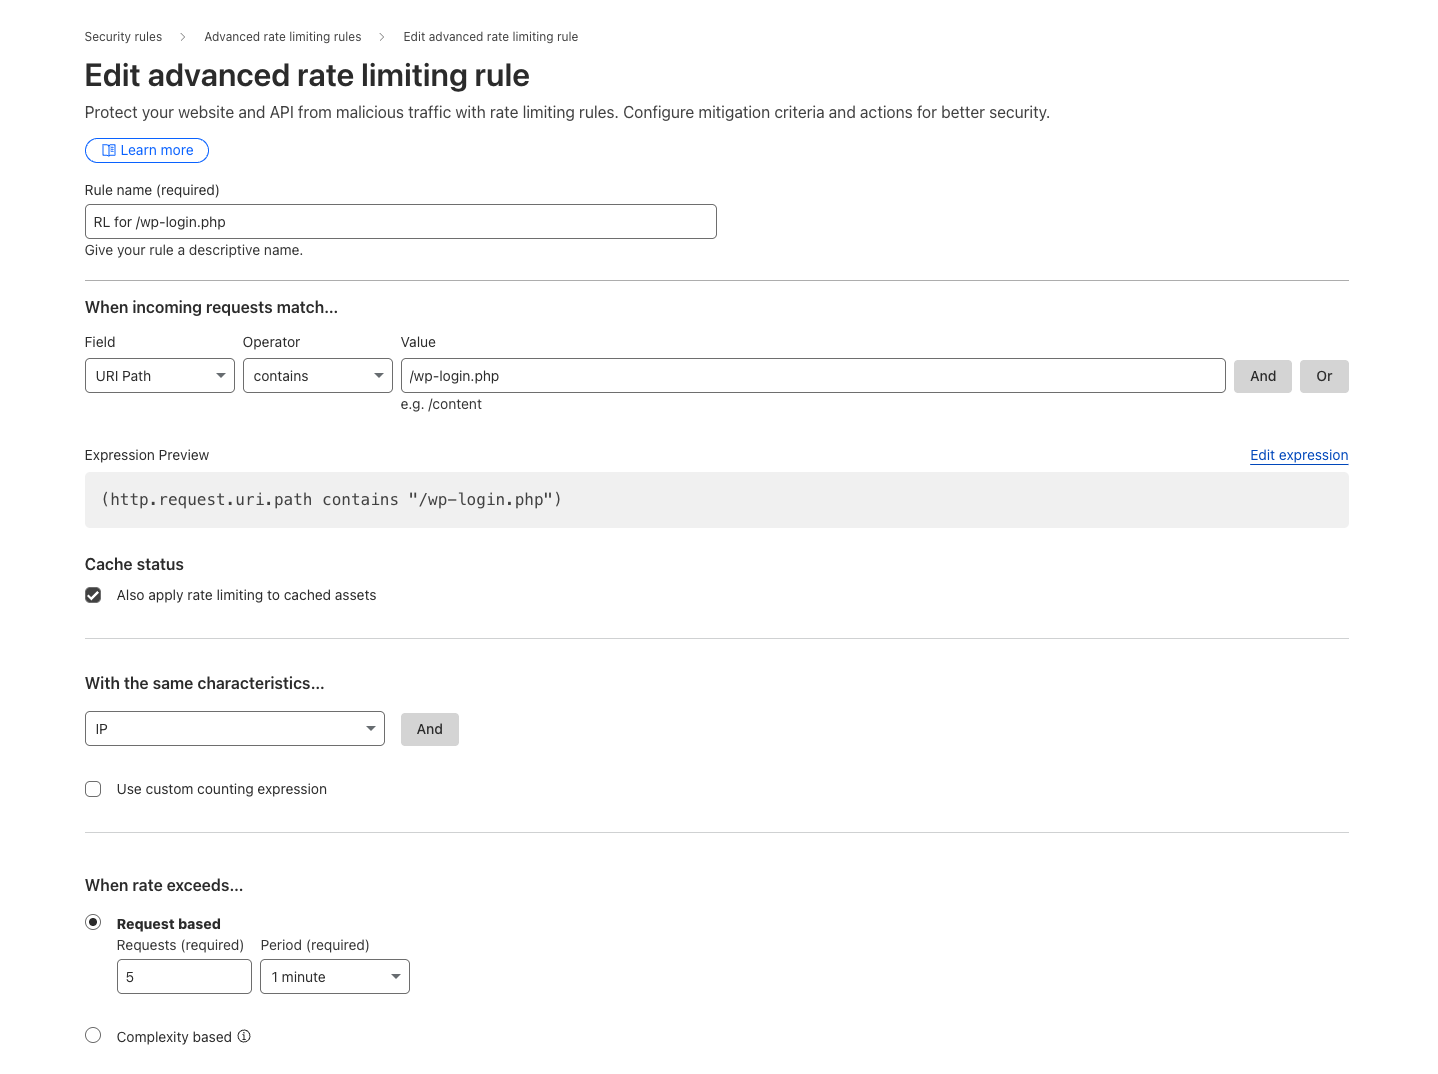
- Your task is to limit request attempts to 5 per minute to prevent brute force attacks.
Use the following criteria:
- Set the Field to URI Path
- Set the Operator to Contains
- Set the Value to /wp-login.php
- Set Characteristics to IP
- When Rate exceeds… 5 requests in a 1 minute period
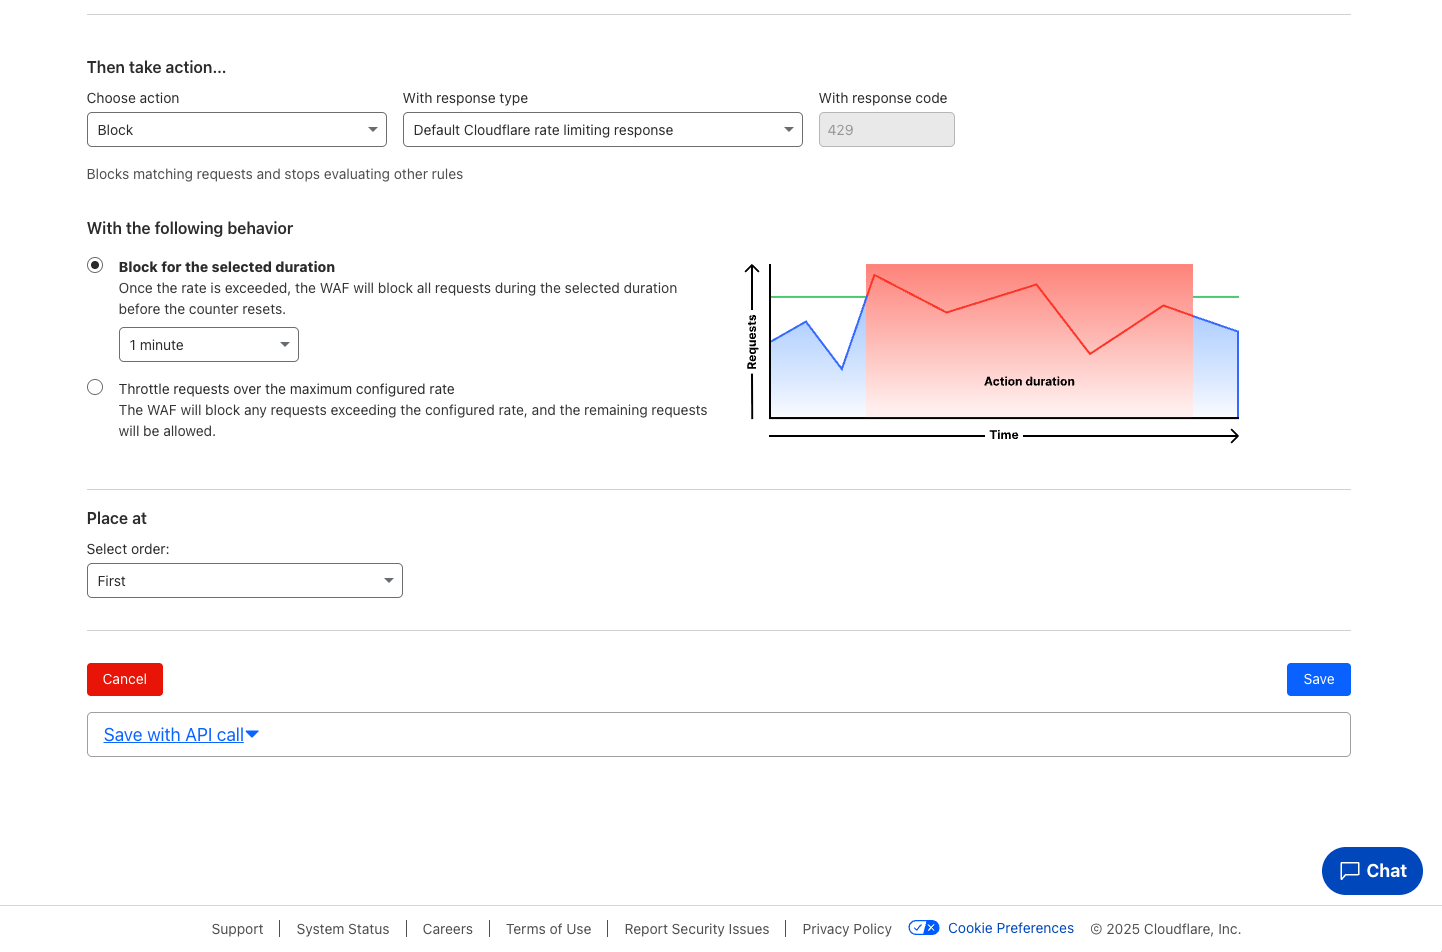
- Set the Action to Block with Response Type as Default
- Select Block for the selected duration as the behavior and set 1 minute as the value
- Click
Save
Your completed rule should look like this:
Rule verification
At this point, you have configured Advanced Rate Limiting rules to limit the speed with URI /wp-login.php.
- Now, lets run some curl command to observed how the Log looks like.
Please replace the URL below with your own domain name.
for i in {1..50}; \
	do curl -svo /dev/null "https://your-domain-name/wp-login.php" \
	2>&1 | grep "< HTTP"; \
done
For example:
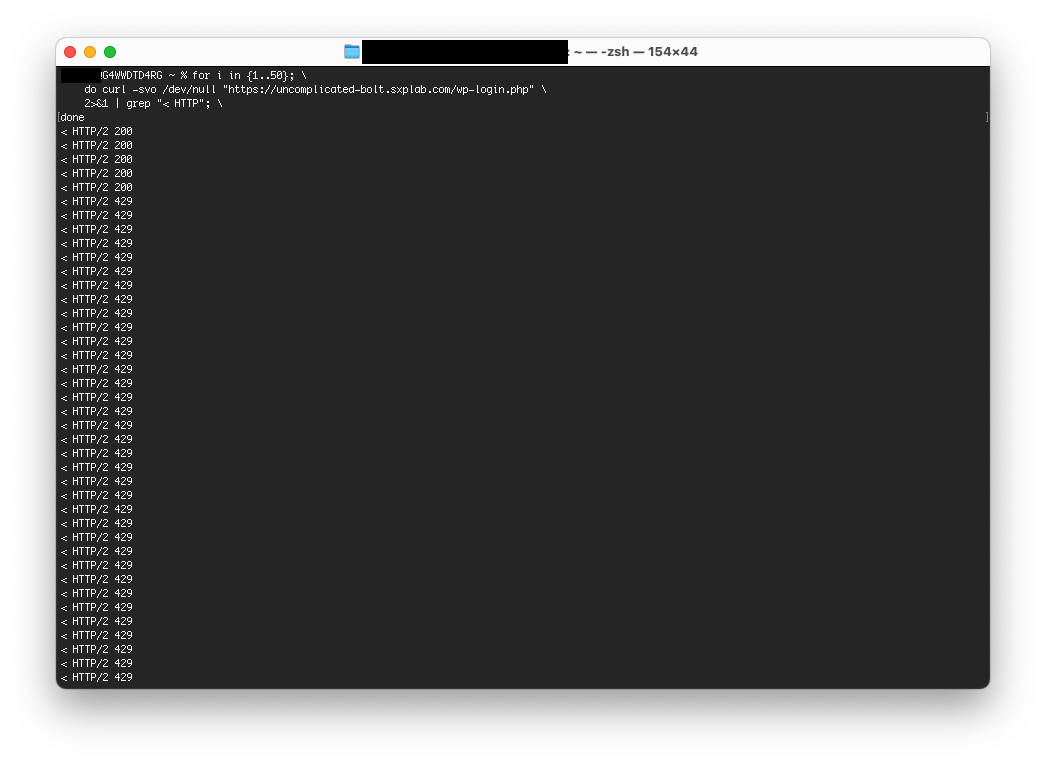
for i in {1..50}; \
    do curl -svo /dev/null "https://uncomplicated-bolt.sxplab.com/wp-login.php" \
    2>&1 | grep "< HTTP"; \
done
- You will see starting from the sixth response is changed from Status Code 200 to Status Code 429.
Learn more about Error 429 HTTP status code on Cloudflare Docs
Checkpoint
- After running the curl command, you will see there is hit count on this Advanced Rate Limiting rules.
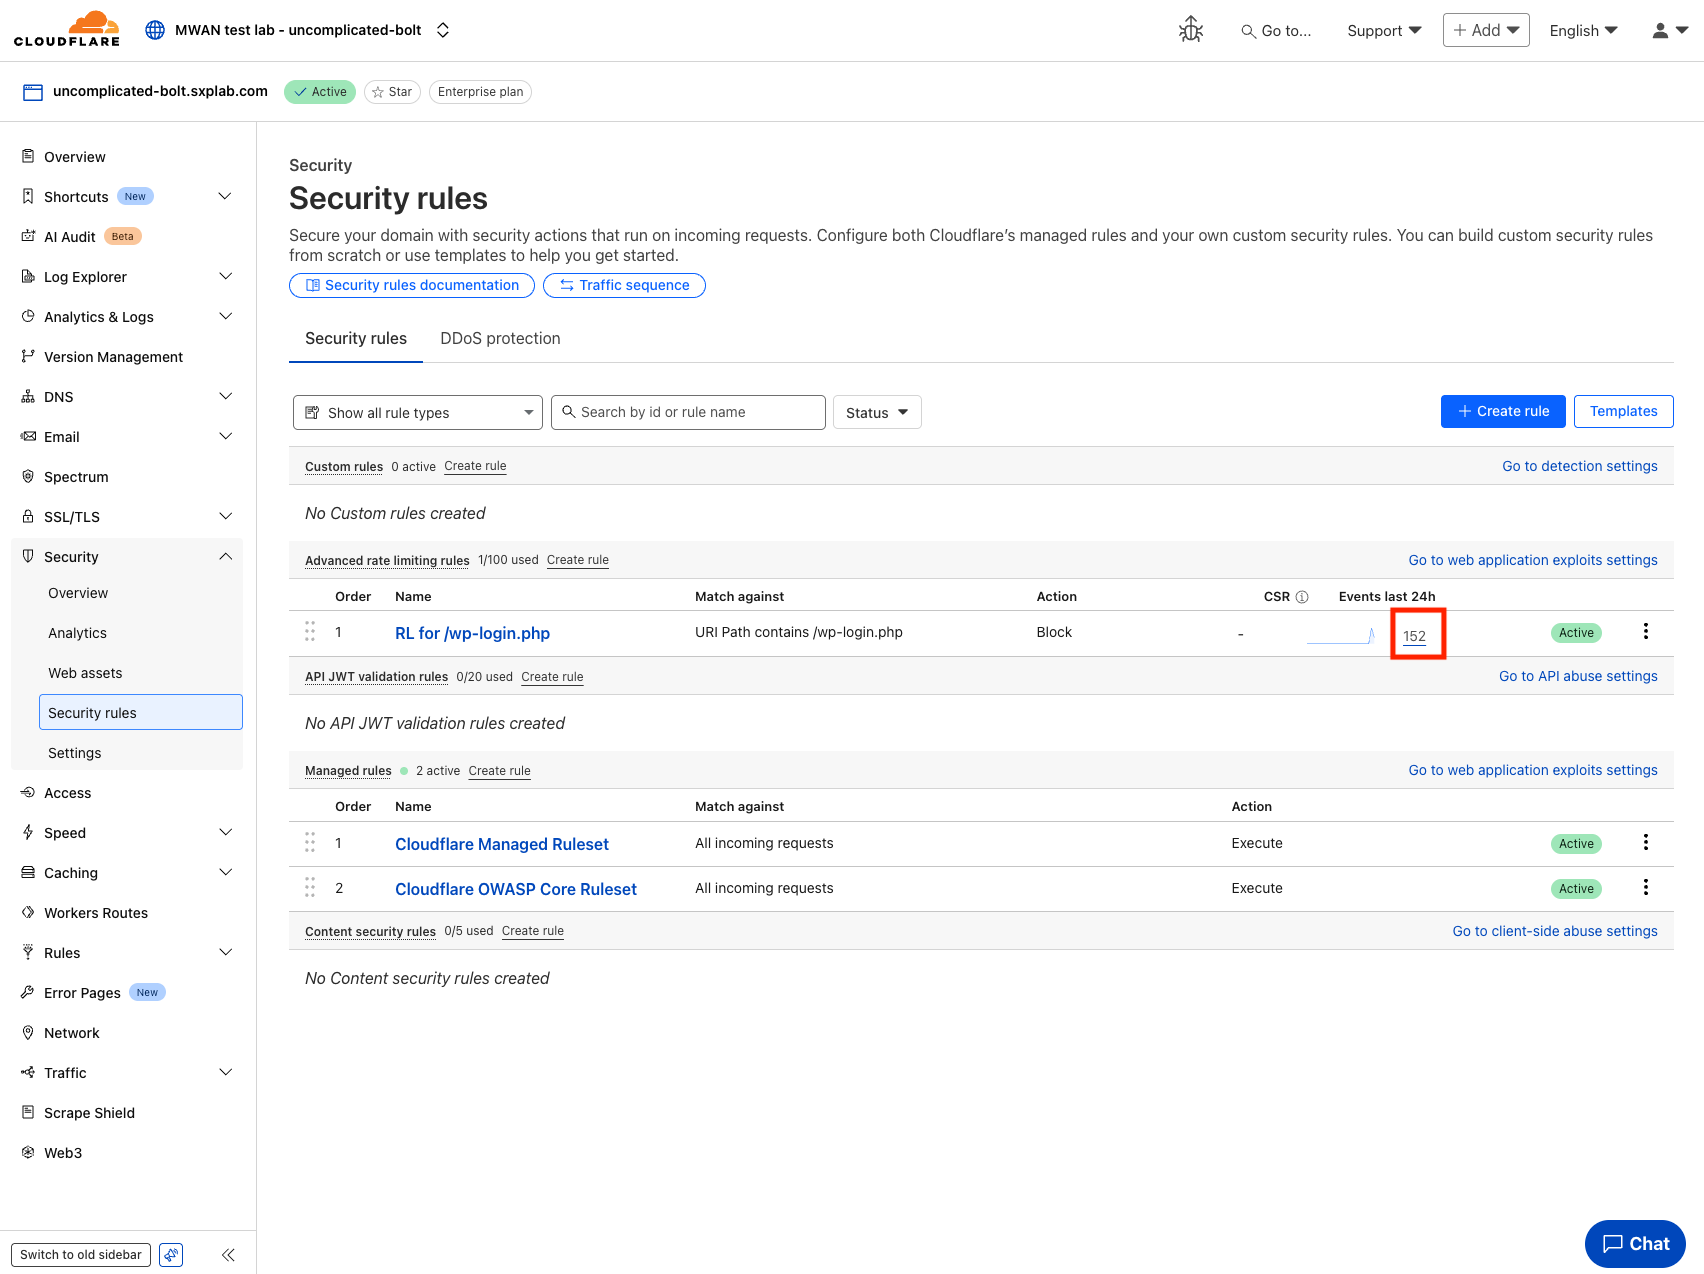
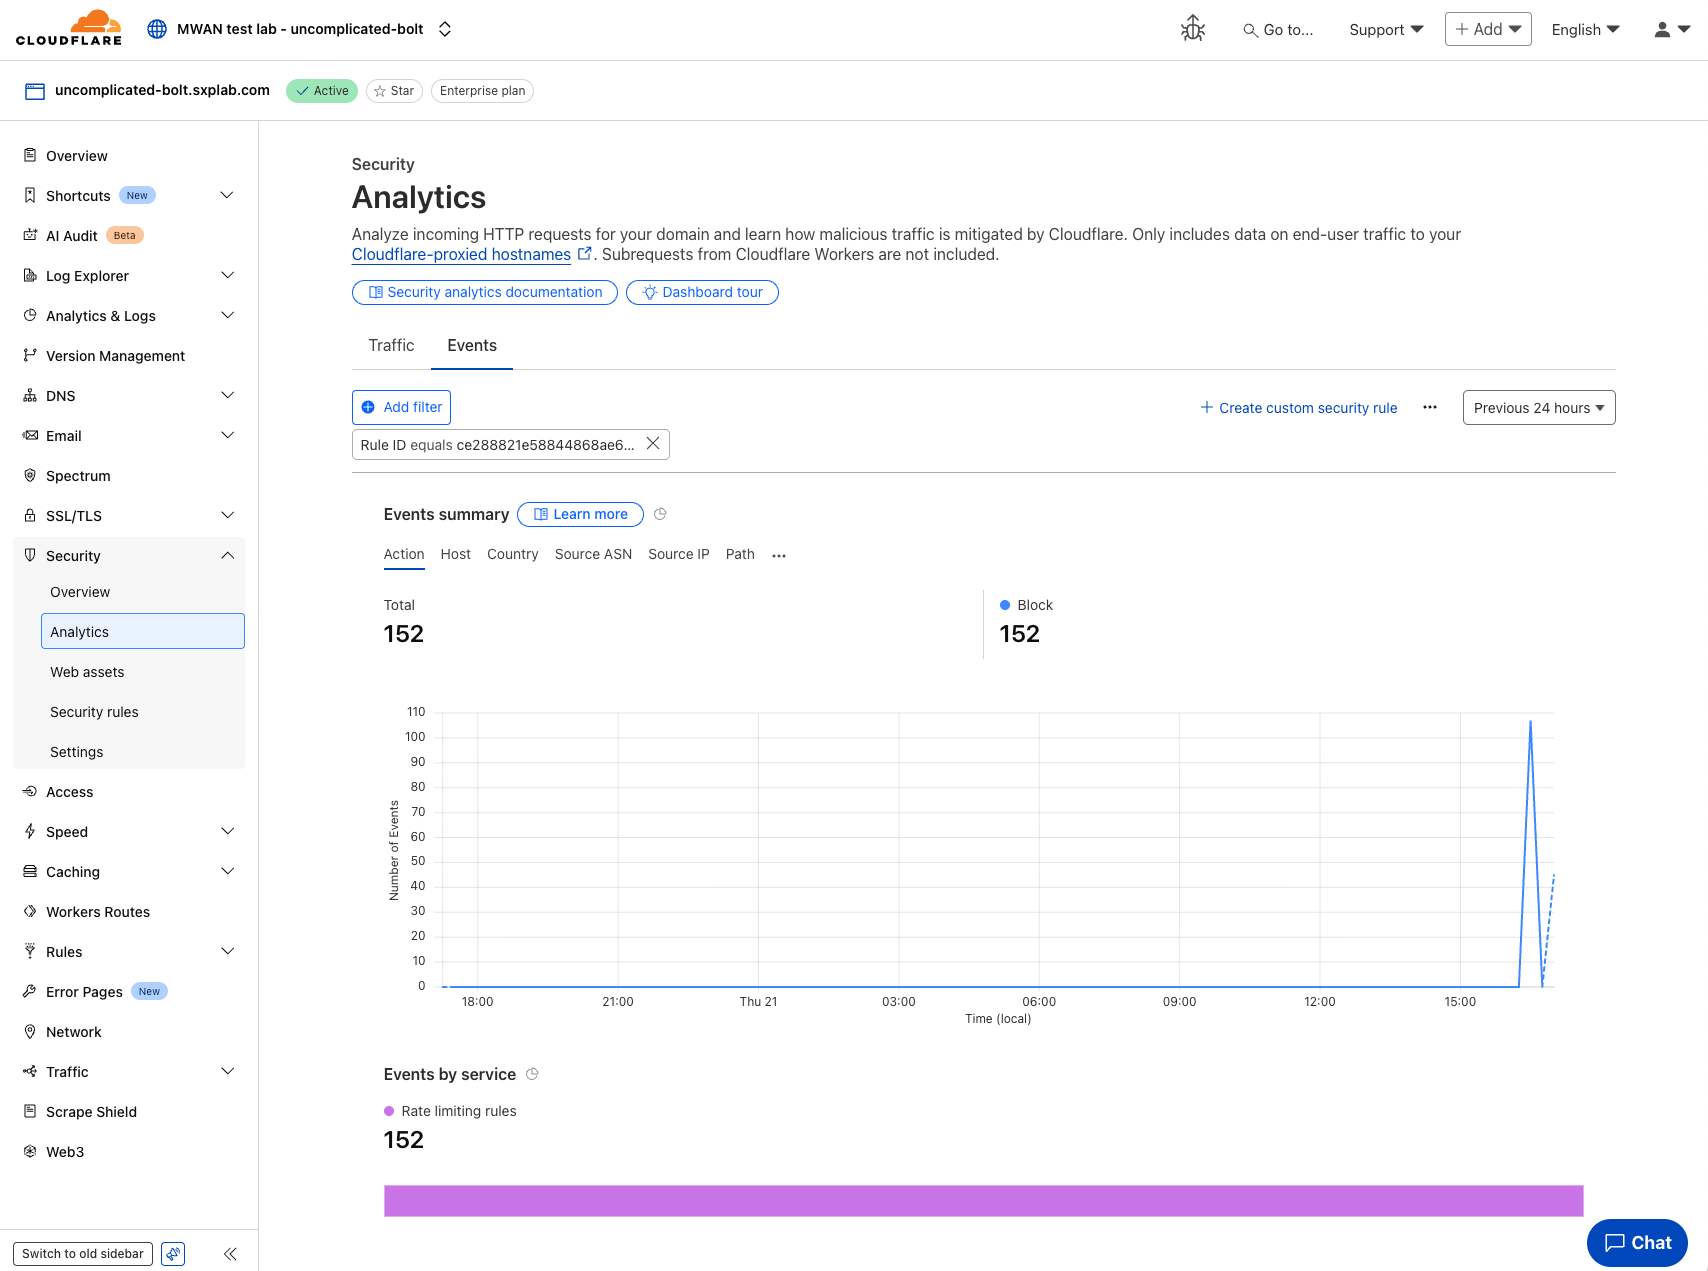
- Click on the number and it will redirect you to the
Analyticspage.
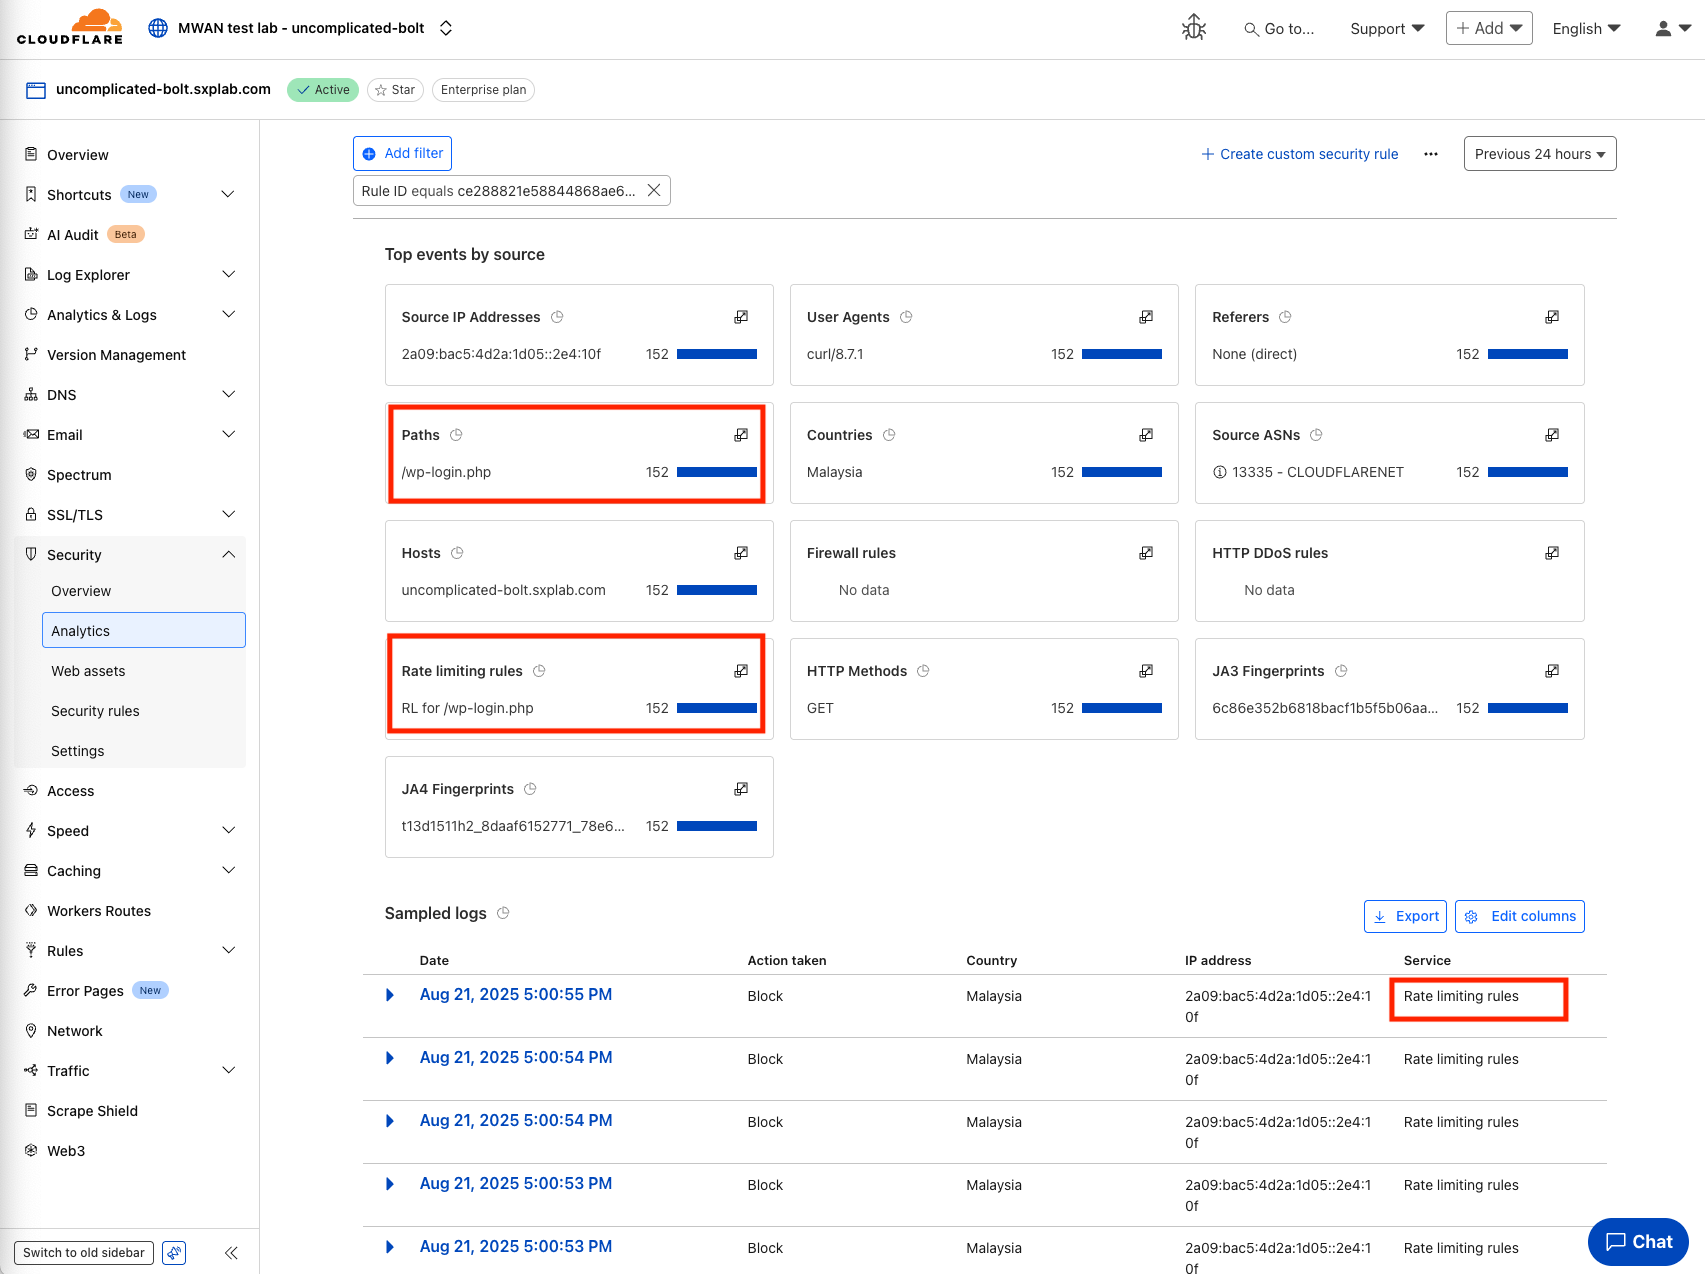
- We further scroll down, and we should be able to see the Paths and Rate limiting rules that is causing these events.
👏 Give yourself a big round of applause—you’ve successfully harden your application with Advanced Rate Limiting rules! 🚀
🎯 Key Takeaways
- Rate Limiting is a powerful Cloudflare feature to protect applications from brute-force, scraping, and denial-of-service attacks.
- It allows you to define rules based on URI paths, IP addresses, headers, or other request characteristics.
- When thresholds are exceeded, Cloudflare can Block, Challenge, or Log requests, ensuring legitimate users are not affected.
- HTTP 429 Too Many Requests is the standard response code when clients are blocked by rate limiting.
- Securing sensitive endpoints like
/wp-login.phpreduces attack surfaces and improves application resilience. - Pairing Rate Limiting with other Cloudflare features (e.g., WAF or Bot Management) creates a layered defense strategy.
- Start in Log Mode → Configure the rule to log only, then check Analytics and Logs. This helps you fine-tune thresholds without accidentally blocking real users.
- Adjust Carefully → Too strict can impact legitimate users, while too loose may let attacks through. Tune gradually based on real traffic data.
- Protect Critical Endpoints First → Focus on
/login,/api/*, or other sensitive routes before applying broad rules. - Learn from Cloudflare Guidance →
When setting up Rate Limiting rules, avoid these pitfalls:
- Thresholds too low → You may unintentionally block legitimate users (e.g., a real customer retrying login a few times).
- Overly broad rules → Applying a rule to
/*can disrupt your entire site instead of just protecting sensitive endpoints. - Forgetting search engines → Blocking Googlebot, Bingbot, or other crawlers may hurt SEO and indexing.
- Not monitoring logs → Skipping Analytics and Logs review makes it hard to spot false positives or missed attacks.
- One-size-fits-all mindset → Different endpoints often need different thresholds (e.g.,
/loginvs./api/checkout).